Friday, 21 June 2013

No excuses now

So the rear lower frame mount is now moved to allow clearance for the carbs.
The engine ends up rotated about 5 degrees forward, fits nice.

Mount removed

Mount removed

Newly re-located mount
My ugly welding

Top fuel Harley head beside my little 650 head.
Almost done. Valves will go back in this week.

Top fueler barrel, cool stuff Roger gets to play with.


 So no more excuses. The engine is starting to go together finally. We'll get it assembled then back in the frame for pipe fitting and bracket locating. Ended up with SS 1 5/8" diameter pipe material. The 1 3/4" was 16 ga, so I figured I'd rather have the 18 ga in the 1 5/8" diameter. Might help a little with bottom end as well. Still not sure if we are going high pipe or low????


Monday, 27 May 2013

Needed

Searched the world for a decent 80mm tach with digital speed indicator, surprising how few of these there are.

Next surprise is how much they cost!

Found two candidates. As/usual I seem to be drawn to the most expensive one.

Motogadget

I will use the starter button, as we are kick start only, as the toggle to scroll through the digital data. I will add an oil temp and oil pressure transducer. This is a very nice German gauge. 100% waterproof, vibration tolerant and has everything we need. Price is over $600... ouch. $700+ once we get the transducers.


Second choice. Pretty cool gauge little more than half the price of the Motogadget ($475).
Nice tach with colour changing needle and shift lights, pretty sure you'd never see any of that at WOT.
I was thinking I could hack the LED's and make the green one a neutral indicator, the yellow a signal indicator and swap out the red for a blue and have a high beam signal.


If I'm going to spend $500 on the SPA, might as well spend $700 on the Motogadget.

By the time we get this mounted it'll likely be 1k+ for a gauge... Wow, I am suprised by how much this bike is going to cost. We'll easily be at 15k cost soon, thats without the labour. It still needs a set of Ohlins for the back, thats another $1500 or so.

Go back six months to when I decided to do this... it was going to be a cheap, low cost build. Hah, sucker born every minute.


Sunday, 26 May 2013

Carb Linkage Mod

So here is the carb set-up with the new throttle linkage position. Now the cable can route down the backbone and pop out in the center of the carbs :)

Just need to shorten the left over throttle shaft on the left side of the left carb. Need to make a shaft seal so it doesn't suck air through the needle bearing supporting the shaft.

I'll shorten up the intake silicone tubes a little, after we get the head back on. Figure we'll go as long as we can to keep that low end grunt where we want it.

Need to make some internal sleeves for the silicone, to match the spigots and throttle bores. it'd be nice not to have steps in the intake tract. As it is, the ID of the silicone obviously fits the OD of the spigots. we'll turn some Delrin (resistant to gasoline) sleeves and press them into the silicone. this will smooth it out a little.

As was from Topham Mikuni. Left side throttle linkage.

Center location


Yummy, accelerator pump. proper 4 stroke stuff.


Saturday, 25 May 2013

Long time

Been busy!, Just getting back to the work on the 650.

Roger is finishing up the work on the head.

I have to deal with the new engine mounts. I put the engine cases in the frame, set on the cylinder and the head and bolted up the carbs. There is nowhere even close to being enough room to fit the carbs properly inside of the vertical frame tube. Even if I could squeeze them in there, I'd never be able to get them in and out without fighting or removing the head, can't have this.

I have read others have had issues with this as well.
Limey Bikes' Hornet has this issue. Here is a quote from his website. "The toughest thing was cramming those RS36 carbs in the frame… in fact it was so tight that the frame had to be shaved a little and there are no intake gaskets… it was that tight. I hope they were worth all the effort!"


Limey Bikes RS36 carbs and fit issues.

Option one, cut the vertical tube and relocate it.
Option two, lean the engine forward, rotating around the lower engine mount.

Option two it is. We will need to make a new rear engine mount, new top engine mount and new forward engine mount....
The rear mount requires cutting and welding, the other two will require making up new engine mounting plates as these bolt to the engine and bolt to the frame. I guess it's an opportunity to strengthen these areas anyways.

I'll post more pictures on the intended changes later today.

Tuesday, 9 April 2013

Little details and a little history

So all the little bits are trickling in.

Things like new springs for the footpegs.
$25 for a pair... good investment huh?


Lost count of what's been spent on fasteners, gaskets, and rubber bits. At least it's almost like a brand new bike.


Sorry to bore you. 

I'm waiting for replacement valve guides. I'll use that as an excuse for not doing the other hundred things I could be doing. The custom exhaust guides were 1/4" too short. Zach over at R/D is going to fix it up and get them here ASAP. 
Later this week, we might put the bottom end together... or wait and do the engine mounts first, before it gets too heavy to lift in and out.

It'll start to go faster soon...


In the meantime, here's a couple of shots of my other XS from oh so long ago. I think I built it for less than the engine in the 650.
Made almost everything. Had no money so had little choice.


Could have used some money for things like heat treating the 6061 T6 frame after welding. Despite the lack of funds, it turned out to be pretty unique. Not too many chain drive XS1100's around. The ones that are are pretty goofy because they just extended the output shaft, which means you have to run a teeny tiny front sprocket to fit. I made a gearbox that had 3 gears in it so I could move the countershaft back. This was before 3D modeling was around. Made designing things a bit more challenging.


Overall, it was pretty cool, but oh so much work. Everything was machined by hand, had no CNC access then either. Things like sleeving the oil pump, machining bigger spigots on the carbs so they'd fit the stock intake boots, lengthening the Gixer fork, all incredibly time consuming and could have been solved so much easier with a little cash.

Note the broken tach needle, thing used to buzz a little at 9k.
It's still sittng in the garage, hasn't been fired up for 6 years.
Maybe when the 650's done ... na been there done that.


Anyways, again sorry to bore you, we'll get back to the XS650 shortly, promise.


Saturday, 6 April 2013

Pipes

Anyone got any other ideas on pipes for this thing?
I like some of these. There's that x pipe thing too. (see bottom)


How about this pipe work, there's some extreme dedication. Now that's a well fit pipe.


I've assumed that I'll be buying some 1 3/4" stainless and be building something on my own. It'd be great to find something off the shelf.


And of course, one of the coolest pipes ever. I still remember the first time I ever saw this bike, burned an indelible image on my brain.


A tip of the hat to this one as well. Whats most remarkable about this pipe, is which side of the engine the intakes on.    
That was a lot of welding and rework to get that intake out of there to show off this pipe. Guy's got some skills.


Wednesday, 3 April 2013

More mocking

So here are some snaps of the latest mock up.
Still thinking about forward lighting. The 7" in the picture is the most tolerable so far. Got an 8" and a couple of projector beams and a KTM triangle light thingy. I like the 7" because I can put the HID bulb I bought in there. It'll be stupid bright, good for my old eyes.


Almost time to start thinking about colours or colors. Kinda like the red and white livery that Yamaha used for DT's and MotoGP for a little while. Actually I think maybe YZ's were red and white for awhile? I also just like the bare steel, a lot. Problem is the seat section is glass. I guess I could attempt to replicate it from steel, but I'd like to maybe ride it this summer!


Now we need all new engine mounts. If we use the stock mounts we end up with a super short intake tract. According to Limey Bikes, he couldn't even use the gaskets under the intake manifolds with his RS's on the hornet bike. Therefore the thought is to have a nice long intake, that firstly allows me to unbolt the carbs without pulling the engine out of the frame, secondly long enough to make some low end grunt, cause its more fun. By tipping the engine forward around the main bottom mount, it also shifts a bit of the weight forward as well. So if we tip it forward like in the pictures, we have the appropriate location. But it means the other 4 mounts don't work. Anyways that's my problem, not yours.


As you can see the carb linkage wants to share the same space as the left petcock. This won't do either. Once again this is my problem, not yours. Pretty sure with a f--king day or so of work, i can move all that crap over to the inside of the other carb. Then the throttle cables can route down the backbone and right into the linkage. The accelerator pump will reside right beside it on the inside of the other carb. Looks like a good plan with my eyeballs. So much for my prepped in Germany Mikuni RS bolt on solution. Whatever. Come this far might as well... you know.

Looking at these pics also painfully reminds me we want to blast off that old floor paint and get a new coat of shiny epoxy down there at some point soon. Oh yeah and all those other chores that need to be done! F--k, almost forgot have to work as well to so I can feed my family... I digress.

Back to my highly honed procrastination/denial skills. Heard today somewhere that denial is now labeled as an addiction WTF? Its also time to get some 1 3/4" stainless bends in here so we can figure out what we're going to do for a pipe. Thinking left side high pipes or maybe a double wrap, both sides, over the cases under the carbs into a single can under the seat, not much else going in there yet. Like to buy  a pipe, but they all suck. At least the ones I've found. If someone knows better, enlighten me please.


Thursday, 21 March 2013

Registration

Ha, got it.
Signed a notarized affidavit about who, how much and where it was bought. Broker almost requested an inspection but said they could sight the serial # and call it done.
Went home threw the frame in the pickup, drove it down there. Convinced them that the rest of it was being restored to stock like condition at some magical place far far away, it helped explain why I had a frame there and not a motorcycle.

Anyways left the broker with a shiny new registration for the bike. No inspection required, at least not until I get pulled over for violating a noise or speed law. I guess it just delays the inevitable.

Tuesday, 19 March 2013

Chuck everything?

So not sure if chucking everything was such a good idea. Went on eBay and spent 60 bucks to buy a worn out set of pegs and brackets. The ones I tossed were much nicer. Anyways the point here isn't the condition, just the fact that I owned a set not more than 5 months ago. Also noting that if I hadn't or weren't still so lazy, I could have put most of those parts on eBay and maybe made back $1000 or so.


Also of note from earlier posting. re: The paperless XS650 I bought. After sending ICBC the required 10 dollars, note from my mother and all the other crap they want, turns out the bike was never registered in BC. So this means, not only can I not find the previous owner to sign over the existing reg, I may also need to have an inspection done before they'll let me register it. F--k! It's so far from being a registerable bike, even when its done. The tiny signal lights, licence plate location, 110 decibel exhaust, fenderless tires etc. are not likely to make me any friends at the local inspectors shop.

Anyways, we'll see what happens. I've got a plan! I'll go see the broker Wednesday.

Friday, 1 March 2013

Engine stuff

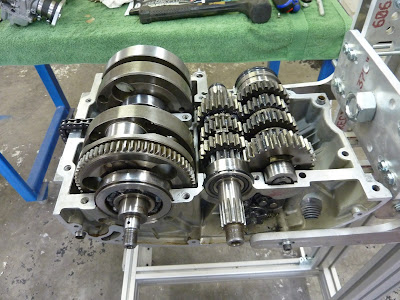
Starts to get interesting here.
Continues to get more expensive here.

Problem attitude - Gone this far might as well put some good parts inside.

Whats this re-phase thing all about???? K Google helped me find my answer. Now my 40 lb crank has been shipped as far away from here as you can get, without falling into an ocean, crank is in Florida at Falicon. Whats it doing there you ask? Well children, it is getting re-phased to 276.923 degrees. Click the link if you don't get it.

Rephased

Shiny new!


So Falicon is replacing the rods, bearings and pins for us while they have it apart. They are going to weld it together re-phased then dynamically balance it for my new pistons and other reciprocating parts. These guys know what they're doing.


Some people cut apart the cam shaft and weld it back together for the re-phase. Megacycle will not cut it in half. They will grind it, weld it, then regrind it with bigger lumps in all the appropriate places.They'll even set me up with a slotted sprocket. Now the slotted sprocket is only for the 447 engines, but if you ask nicely and offer cash, they'll do it on the 256 sprockets as well. If you elect to not go with the slotted sprocket, the cam needs to be degreed by pressing the sprocket on and off the camshaft. Not a good plan at all.


Perfect work.


 Anyways now I have a beautiful new 250-30 cam to match my funny crank. Of course you need sparks to happen at the right time in this engine. So we acquired a Pamco ignition kit. obviously, the dual coil re-phased one.

Of course the cam needs something to lift. I was happy with the 1mm larger than stock valves and the 103Y spring kit with aluminum tops... but then someone mentioned 7mm valves... damn! WTF I need to stop listening. Anyways found a guy who would custom make me 7mm valve stemmed 2mm bigger diameter than stock intakes and 7mm valve stemmed stock diameter exhausts. He'd also make me new guides to fit the skinny stems, get us some kick ass springs and top it off with some cool titanium tops. He'd even throw in some seals and we'd be good to go. Soooooo.... after mulling it around and falling back on that previously mentioned adage, we've gone this far might as well ...


Mmmmmmmmmm Ti


Okay, following along here? So we now have 80mm pistons attached through new NOS rods and bearings on our re-phased dynamically balanced crank inside our 750cc cylinders. This is breathing through the 7mm stemmed, lighter, (wayyyy lighter), than stock valves, being lifted .440" up into the air by the re-phased cam pushing the new NOS rockers, sucking air and fuel through a beautiful set of RS Mikunis being lit by a kickass ignition... good right? Well good enough for some.


... But wait, the ports suck in these heads, and I mean suck. in a bad way, not the good way. The exhaust ports are way to big and horribly shaped with really bad core shift. Intakes are just about as bad and are horribly shaped. So I showed them to my friend Roger :). This is always a good idea. He can't stand crap, even less than I can. I shared with him some of the documentation I had dug up on XS flows and showed him the inserts available for "fixing" the exhaust ports. I gave him my new valves and guides and asked him to keep the bill reasonable. Well he ignored my request and fixed it his way. There is a lot of welding in those ports. The engineers over at Yamaha wouldn't recognize their own f--k'd up ports ever!

Roughed intake, no guide yet.


Welded and roughed exhaust, no guide here yet either.

Shrouding removed, seats roughed out.
Wish I had a picture of stock to show.


F--king nice ehh? Roger is impeccable as/usual.

So any guesses on what the little 650 turned 750 engine costs now? Don't forget the new clutch hub, plates, friction discs and springs. Don't forget the new transmission bearings. Don't forget the labour to bead blast all the cases and refinish them all with high temperature coatings. Don't forget the new timing chain and tensioners. Don't forget the $300 for the permanent magnet alternator so I can have some spark at low rpm when I kick it. You can forget the extensive welding, porting and valve seat/guide fitting work, Roger's paying for that :).

So how much?... 4k ish in the engine lets not add it up accurately K. Tracy has a computer and I don't think she really wants to know. One thing I'm leaving out of this so far is the freight. So far there is well over 2k of UPS/FedEx/USPS/Canada Post/Hong Kong Post/Royal Mail charges. Being on the west coast of Canada, and having to bring it all here, sometimes there then here a la crank and cam, adds up, big time.


New rockers good to go. Have to take care of those pretty cam lobes.